Showing posts with label tutorials. Show all posts

Tuesday, November 2, 2010

Tutorial: Burp Cloths....and GIVEAWAY

Burp cloths are about the easiest homemade baby gift ever. Simply take a piece of fabric and stitch it on top of a cloth diaper and you're done! Here's my method:
DSC05465-1
I prefer to have the fabric piece running across one end, leaving the super absorbent core down the middle uncovered and ready to catch the worst of messes.

To get started, you'll need some cloth diapers, Prefold 3-ply or 6-ply (make sure they are the PREFOLD.) Prewash because these babies shrink a lot.
DSC05439-1

After your burp cloths have been washed and dried, iron a few to make them nice and crisp. Measure the width. (Gerber does not make these things anywhere near perfect. Some will be drastically different sizes, so try to use two that have a similar width. Also the bottom edge may be very uneven. If so, try the other end of the cloth and use whichever is the straightest.)
DSC05440-1
Now we are going to make a cardboard template. Cereal boxes work great! It will be the same width as you measured from your burp cloth and 3.5" tall.
Burp Cloth Tutorial: Cereal box template
Next we will determine the measurement for the fabric pieces to top the burp cloth with. Everyone's burp cloths will be such different sizes, I am going to walk you through using your width measurement taken and adding a seam allowance. Take the measurement you got for your burp cloth width and add approximately 3/4"-1" to your width measurement (giving you a generous 3/8" seam allowance for each end.) I like to make my decorative fabric about 3.5" tall, so we'll again be adding 3/4"-1" for the seam allowance (giving a 3/8" for each side.) My measurements ended up being 14" x 4.5".
DSC05425-1
Once you have your fabric cut out, place it face down on your ironing board and lay your cardboard template on top, centering it.
DSC05435-1
Hold your template steady while folding the edge of the fabric over the template and ironing it in place. Do this for each side.
DSC05443-1
Take the cardboard out and press the fabric one last time to give the edge a good crisp fold.
DSC05447-1
Lay the piece of fabric on top of your burp cloth (right side up) about 1.5" from the bottom edge. You could line it right up on the bottom edge if your burp cloth is really straight. Most are not, so I find it best to put it slightly above the bottom, just high enough that your straight edge of the fabric wont emphasize the uneven bottom seam of the burp cloth.
DSC05449-1
At this point you may need to adjust the sides, taking the fold in more or letting it out, to match the sides of the burp cloth. Now just pin and stitch all the way around the edge of the fabric about 1/8" from the edge. ( I like to use monofilament (clear) thread, but you can also use any coordinating thread color.)
DSC05455-1
And you're done! Now just make a matching one! DSC05457--1
These can be embellished in so many different ways, like adding ribbon or ric rac to the top or bottom edge of the fabric, or both. Or try placing your fabric along the bottom edge of the burp cloth and adding ribbon loops giving the baby a little entertainment while keeping the burp cloth close at hand to catch any surprise spit-ups!

DSC03464-1
These make such great baby shower gifts. A great way to have a little style while carrying around a spit rag!

GIVEAWAY!!!
Just leave a comment to enter to win the set of burp cloths seen below! Extra entry if you blog, tweet, or whatever about this post (just leave an additional comment.) Giveaway will end Sunday Nov. 7th at midnight CST.
Riley Blake burp cloths

Monday, June 14, 2010

Appliqued Onesie

Appliqued Onesies
I've got soo many white onesies from when my first son was a baby and have decided to spiff them up a bit for baby #2. Appliqued onesies are so easy and cute. Here's a little tutorial for you on how I make them. (Im sure that there are about a thousand other ways to do it though.)

To start out, you'll need:
a onesie (dont be afraid to use a colored one)
a fabric cut-out to use for the applique (just a rough cut for now)
Wonder Under
light-weight iron-on interfacing

Appliqued Onesie - materials needed

Take your rough cut applique piece and place it face down on the paper side of your Wonder Under. Trace around your shape. I like to use a sharpie, but pretty much any marking device would work. (Dont worry about getting ink along the edge of your applique since the edges will be getting trimmed.)

Appliqued Onesie - step 1
Cut out the shape you just drew on the Wonder Under, being sure to cut just inside of the lines (so there isnt any extra hanging over when we apply it to the fabric.)

Iron the rough side of the Wonder Under to the wrong side of the fabric applique piece using the directions listed on the Wonder Under. I usually just simplify it and hold the iron on the piece for about 10 seconds.

While the fabric is still a little warm, peel off the paper backing. (Sometimes the paper can be a bit tricky to get off. Try another quick iron to warm it up if you're having trouble.) Now you can trim down the edges of the fabric to exactly how you'd like your final applique to look.

Iron the applique piece to the front of the onesie. (A lot of people make the mistake of placing it too low and it ends up on the belly of the baby. I'd recommend putting it pretty close up to the neck line.) Technically you could be done at this point if you are in a super hurry. Wonder Under claims that you do not need to sew around the edge to anchor it down. I've never tested out that claim though.
Appliqued Onesie -step 2

Turn the onesie inside out. Cut a piece of interfacing that will cover the back side of the applique and reach 1/2" past all edges of the piece. This will stabilize the knit fabric when you sew it, so it wont pucker or pull.
Appliqued Onesie - step 3
This picture is really hard to see, but it's the onesie inside out. You can see the applique showing through from the front and a piece of interfacing has been ironed on.)

Now just flip the onesie back to right side out and stitch around the applique, approximately 1/8" from the edge, using matching thread or even clear thread (that's what I used on this one.)
Appliqued Onesie - step 4
And you're done! Now go make another!
Appliqued Onesie
There are so many great fabrics that you could use as cut-outs for the applique. This is also a great way to save a stained onesie from the trash! Or you could even place a new applique over an old printed store bought onesie that you are just plain tired of.

A friend of mine had a baby shower recently, and they actually made appliqued onesies at the shower! I thought that was such a genius idea. The hostess had some fabrics ready for the guests to choose from to use as their applique and they each just ironed their creation on to a onesie. Super quick and easy, and so cute! If the hostess is as neurotic as I am, she could go back later and stitch each one to make sure it's nice and anchored down.

Saturday, May 15, 2010

Garage Sale Finds & Tutorial

I found some really great items at a garage sale recently. All for $2!
Garage Sale finds
Turning tool, glass jar (with a really cute finial-like top), and a bundle of bias tape makers
Bias tape makers
The tape makers run from $5-$10 each brand new, and these dont look like they've ever been touched!

Have you ever heard of a turning tool?
Turning tool
It's a tool that helps you turn fabric tubes right side out (like ties for an apron, etc.)

This tool isn't a necessity, especially at its hefty price of anywhere from $30 to upwards of $60! But it sure is great to have if you can find one on the cheap. In another post I'll show you how to make your own version of a turning tool that has worked wonders for me previously to getting my hands on this great little tool set.

If you've never heard of a turning tool before and wonder how this contraption works, here's a little tutorial for you:

Start out with your tube of fabric, sewn right sides together, a metal tube from the set that fits in your fabric tube and a wire hook.
Turning tool tutorial- supplies
notice the little spiral on the end of the wire?
Turning toos tutorial- supplies
Stuff your fabric over the metal tube.
Turning tool tutorial- step1
Insert the wire in the metal tube.
Turning tool tutorial- step2
Pull your fabric just over the end of the metal tube and push the wire spiral through the fabric.
Turning tool tutorial- step3
Gently start to pull the wire back through the metal tube and the fabric will start to pull through, turning itself right side out.
Turning tool tutorial- step4
As you pull the fabric, it will come out the other end of the metal tube.
Turning tool tutorial- step5
Keep pulling until the fabric is all the way through and Voila! Your fabric tube is now right side out! Just iron your fabric tube and you're done!
Turning tool tutorial- finished
Super fast and simple. So much better than spending hours trying to push a safety pin through all that bulky fabric!

Wednesday, December 23, 2009

Last Minute Christmas Gifts with tutorials

I just wanted to drop in one last time before the holidays and give you guys some ideas of things you can make for those last minute gifts, instead of running out to the store in a frenzy. These ideas are easy and inexpensive.

Bean Bag Balls
These are great for those sport-loving kiddos who cant live without a ball in hand.
I made these for my son's 2nd birthday, and they were a huge hit. Now if only I could find the baseball and football...

For these I traced a 5" bowl and cut out two circles of fabric and two circles of interfacing for each. Iron one piece of interfacing to the wrong side of each fabric piece. Next, you add the details for each of the different balls. First use a fabric marker to mark the lines. For a basketball, baseball, or football, use a tight zig-zag stitch (the 2nd to smallest your machine will do) and just follow the lines on the fabric. For the soccer ball, I cut out 10 pentagons of black fabric, 5 for each side of the ball, and used a larger zig-zag stitch to applique them on.

Next, just put the two fabric pieces together, right sides facing, and sew around the circle leaving a small opening for turning. Turn the ball the right side out and fill. You can use rice, dried bean, etc. but I chose to use Poly Pellets so the balls would be washable. Lastly, just stitch the opening closed.

Coasters
These are so incredible easy to make and only use small scraps of fabrics. It would also be great to use non-Christmas fabrics for year round use. And you can make them whatever size you want. Mine ended up around 4".

I cut strips of fabric about 1-1.25" wide by 4.5" long, batting 4" square, and backing 4.5" square. Lay your first strip of fabric, right side up, on top of your batting, overlaying the fabric about 1/4" around the edges of batting (so that the batting doesnt cause extra bulk in the 1/4" seam.) Lay the second piece of fabric right side down on the first piece, lining up the edge with the first fabric and stitch a 1/4" seam allowance, going through the two fabrics and the batting (the two fabrics on top right sides together and batting on the bottom.) Fold the 2nd fabric open and press.

Keep adding more pieces of fabric until your coaster is covered. Square up the top, by triming any excess on the edges. Next place the pieced top, right sides together with the backing material and sew around the coaster, leaving a small opening for turning. Clip the points off of the corners (to eliminate bulk) and turn the coaster right side out. Iron flat and stop stitch around the edge with a 1/8" seam.

For ideas on other fabric coasters, visit the Sewn Fabric Coasters Flickr Group.

Black Apple Dolls
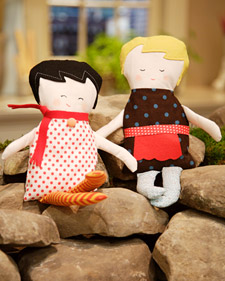
These new modern-faced dolls are all the rage. The Black Apple brand originated on etsy as artwork. I was so excited when I saw that Martha Stewart crafts showcased these dolls, with templates included! They are soo simple and can be made in so many different ways by changing the hair color, facial expression, accessories and clothing, you might find yourself making these every year. No little girl would ever get tired of them! Click here to go to the tutorial.

Fabric {paper} Chain
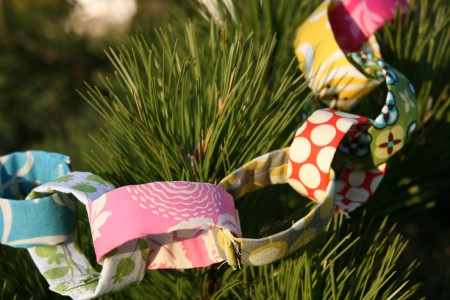
Paper chains are a favorite around the holidays for children. Why not make them more eco-friendly, much more attractive, and not have to re-cut those darn paper strips every year (I dont know about you, but I hate having sore-scissor hand!) Ashley from Film in the Fridge was brilliant when thinking of these. Just small fabric tubes with velcro! I cant wait to make one next year. These would also be great to use with kids for counting down to any exciting event, like birthdays, other holidays, and vacations! Click here to go to her tutorial.

Fabric Alphabet
A GREAT educational homemade gift! This would make a great gift for kids aged 1-5 years old. They can be used to learn letters, sounds, the alphabet, spelling and much more. These do take a little time to make, but are well worth it. I've just made the A and B so far, but am planning to finish the rest of the alphabet for a Christmas gift to my son. To make these just use any word processing software ( like Word) and print out the alphabet in large letters (I did mine landscape with two per page, so they're about 7" tall.) Layer your top fabric, batting (cotton preferably), and a backing material (I use inexpensive white muslin.) Trace your letter on the material and cut a 1/4" outside the lines, cutting all three layers at once. Stitch on your drawn line, then cut slits all along the edge, cutting as close to the stitching line as possible without actually cutting through your stitches. Wash and dry to get the nice ragged edge.

I hope these tutorials help you with this crazy time of year! I wish you all a very merry Christmas! And I cant wait see you back here in the new year with many more great tutorials and ideas for you to try out!

Wednesday, December 9, 2009

Quilting using a Walking Foot

I wish someone would have opened my eyes up to the wonders of the walking foot a long time ago. It's not just for quilting. It's great to have for many other sewing/crafting projects. In really basic terms, it helps feed all the layers through your machine evenly. When sewing with a regular presser foot, your bottom layer is pulled through with the feed dogs but your top layer is dragged beneath the presser foot. A walking foot raises itself up and then sets back down with every stitch of the needle. So the top layer is feed through at the same rate as the bottom. It is especially great to use with fabrics that are stretchy.

If you haven't worked your way up to free-motion quilting, you can still easily quilt your own quilts, instead of paying some else to do it or tying them. In fact, a lot quilters use a combination of free motion quilting and straight stitching (with a walking foot or darning foot.)

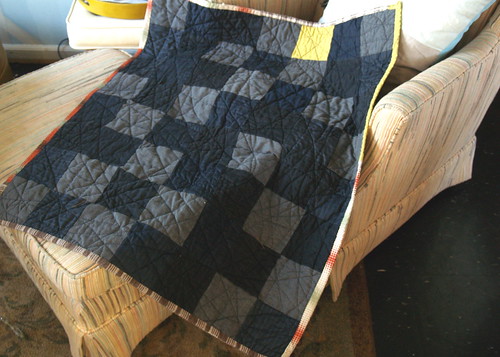
It is so incredibly easy to quilt using the walking foot. If you can sew a straight line (or not even a straight one!), you can quilt. That's all there is to it. Below are some quilting examples that can be done using a walking foot. (Look closely at the stitching to pick out the different quilting styles.)


Cluck Cluck Sew's quilt for her son's bed


Monday, September 14, 2009

Practice Makes perfect

I am so sorry I have taken forever to get to this. We've had some fun-packed last couple weeks of summer. And I had so much floating around in my head for this post, I didnt know where to start.

First off, to "quilt" your doll quilt in the stippling method I used, you will use a Darning Foot (which is used for all free motion quilting.)

I highly recommend taking a Beginner's Quilting class at your local quilt shop. That's what I did, and I loved it. I learned so much more than I thought there ever was to it, and not to mention had a ton of fun having a "me" day and socializing with all the other quilters there.

The key to learning how to quilt is practice, practice, practice. In the class I took, we prepared a quilt sandwich that was 24"x24" out of scrap batting and two inexpensive pieces of muslin. I think this is a really great way to learn and practice, so I encourage all of you interested in learning to try this out.
Start out by using your walking foot (more on the walking foot to come) to sew straight lines down the center of each side, dividing the 24" square into four 12" sections. Using a walking foot I'd say is the easiest way to quilt, so in class that's what we started with.

To do a grid pattern, use your quilting ruler and fabric marker to draw one line on the fabric to follow while sewing. Sew you first line directly on your marker line. Next just move over however far apart you want your spacing to be (mine is 1" here) and using your first sewn line as a guide, simply stitch the next row. Then just keep going, using the last row sewn as a guide for the next.
I know what you're thinking. You dont have to be perfect for this to turn out well. In fact, it hides mistakes very well. In the picture you can easily pick out my mistakes, but I promise, in real life they are totally hidden. Not to mention that fact that it helps to use matching thread (instead of dark blue thread on white cloth like I did! But you can definitely see it.)

Next up is one of my favorites. Im not sure of the name but it's really fun and super easy. It's all just eye-balled. Just start out at whatever spot you'd like, and using your walking foot, just quilt as if you were sewing straight lines. But instead of holding the fabric still, turn it from side to side to make the lines curvy. And you really have to move it around quite a bit. I cant wait to do this on a really cute kids quilt.The next two sections, we used the Darning foot. In one section we did stippling (looks kinda like puzzle pieces) and the other was loops. I didnt take a close up pic of my stippling because it was hideous, but you can see it in the first picture. The loops were pretty easy, but for reason I really dont care for them too much. I quickly moved on to trying out other things. Can you see the flowers, leaves and ivy, my name, and stars that I did? I was quite proud of my self for it being my first time free motion quilting.
Before trying my hand out again at the stippling, I definitely needed some help. I just couldn't wrap my mind around making a random pattern and still starting and finishing at a designated spot. Using a pen and paper helped immensely! Just some old computer paper and sharpie did the trick for me. It finally clicked in my brain.
(obviously these aren't perfect, but much better than before)

Now it's time to practice again using more scrap fabric and batting. Another big part of free motion quilting is the coordination to move the fabric at the correct speed as you press the peddle to make the needle goes up and down to stitch. You dont want your stitch length to be too long or too short. Now get out there and practice, practice, practice!Amandajean over at Crazy Mom Quilts has another great tutorial on free motion quilting with a video.