Showing posts with label stash busters. Show all posts

Thursday, July 1, 2010

July Fussy-cut Bee

If you stop by here often, you probably have heard that I participate in the Fussy-Cut Bee. Well it's finally my month! Wohoo! Im so excited. I had a really hard time deciding what I wanted to do, so I went with something that I've had in the works for a long time.

Here's what I started out with:
Sneak Peek
Alexander Henry's Starlings bird print for the fussy-cut block centers and coordinating colors taken from the print (red, light blue, lime green, yellow, light pink, dark pink, and black/white.)

And finally decided to go with a wonky log cabin block.
Fussy-cut Bee Block example- July Group A
You can find a tutorial over at QuiltDad's for the wonky log cabin.

I am so horrible with anything that's "free-style", so this is a great one for me to have a little help with from my bee members. Im really excited to see what they come up with.

You can see more blocks as they are finished up by my bee members over in our group pool on flickr.

Friday, June 4, 2010

All Star Mini Quilt

All Star Mini Quilt
I had a bunch of long skinny strips leftover from my other two All Star quilts and wasnt quite sure what to do with all the tiny scraps. Im not very creative when it comes to using my scraps, so I went with the typical mini quilt.
All Star Mini Quilt close up
Because it's so "scrappy" it became a little busy for my taste. I usually prefer quilts to have more negative space (i.e. areas of the quilt that give your eye rest or don't demand attention), like using solid borders and sashing. But this was made to be used and is not sentimental, so I don't really mind the busyness.

And I barely had enough to finish! The quilt back and binding had only inches to spare! It measures 18"x 21" approx.
All Star mini quilt back
This mini quilt is a little out of the ordinary though. It's the first anything that I've made for my immediate family to keep. No quilts, no baby bibs or burp cloths, no diapers and wipes cases, no nothing.
All Star mini quilt back close up
The plan is for this to be a changing pad for our new little boy arriving in September. Our place is pretty cramped right now and he will be in our room for quite a while. So this pad will be a great place to change diapers without worrying about getting our bed, his bed, or the floor dirty. Although, with little boys and their "accidents" during changing time, we may need a few more of these!

Wednesday, December 23, 2009

Last Minute Christmas Gifts with tutorials

I just wanted to drop in one last time before the holidays and give you guys some ideas of things you can make for those last minute gifts, instead of running out to the store in a frenzy. These ideas are easy and inexpensive.

Bean Bag Balls
These are great for those sport-loving kiddos who cant live without a ball in hand.
I made these for my son's 2nd birthday, and they were a huge hit. Now if only I could find the baseball and football...

For these I traced a 5" bowl and cut out two circles of fabric and two circles of interfacing for each. Iron one piece of interfacing to the wrong side of each fabric piece. Next, you add the details for each of the different balls. First use a fabric marker to mark the lines. For a basketball, baseball, or football, use a tight zig-zag stitch (the 2nd to smallest your machine will do) and just follow the lines on the fabric. For the soccer ball, I cut out 10 pentagons of black fabric, 5 for each side of the ball, and used a larger zig-zag stitch to applique them on.

Next, just put the two fabric pieces together, right sides facing, and sew around the circle leaving a small opening for turning. Turn the ball the right side out and fill. You can use rice, dried bean, etc. but I chose to use Poly Pellets so the balls would be washable. Lastly, just stitch the opening closed.

Coasters
These are so incredible easy to make and only use small scraps of fabrics. It would also be great to use non-Christmas fabrics for year round use. And you can make them whatever size you want. Mine ended up around 4".

I cut strips of fabric about 1-1.25" wide by 4.5" long, batting 4" square, and backing 4.5" square. Lay your first strip of fabric, right side up, on top of your batting, overlaying the fabric about 1/4" around the edges of batting (so that the batting doesnt cause extra bulk in the 1/4" seam.) Lay the second piece of fabric right side down on the first piece, lining up the edge with the first fabric and stitch a 1/4" seam allowance, going through the two fabrics and the batting (the two fabrics on top right sides together and batting on the bottom.) Fold the 2nd fabric open and press.

Keep adding more pieces of fabric until your coaster is covered. Square up the top, by triming any excess on the edges. Next place the pieced top, right sides together with the backing material and sew around the coaster, leaving a small opening for turning. Clip the points off of the corners (to eliminate bulk) and turn the coaster right side out. Iron flat and stop stitch around the edge with a 1/8" seam.

For ideas on other fabric coasters, visit the Sewn Fabric Coasters Flickr Group.

Black Apple Dolls
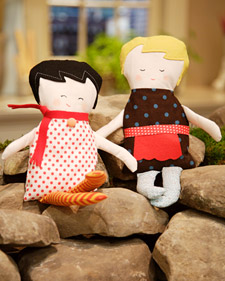
These new modern-faced dolls are all the rage. The Black Apple brand originated on etsy as artwork. I was so excited when I saw that Martha Stewart crafts showcased these dolls, with templates included! They are soo simple and can be made in so many different ways by changing the hair color, facial expression, accessories and clothing, you might find yourself making these every year. No little girl would ever get tired of them! Click here to go to the tutorial.

Fabric {paper} Chain
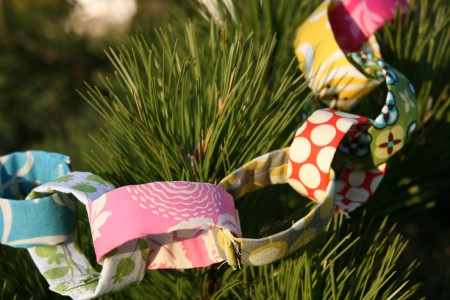
Paper chains are a favorite around the holidays for children. Why not make them more eco-friendly, much more attractive, and not have to re-cut those darn paper strips every year (I dont know about you, but I hate having sore-scissor hand!) Ashley from Film in the Fridge was brilliant when thinking of these. Just small fabric tubes with velcro! I cant wait to make one next year. These would also be great to use with kids for counting down to any exciting event, like birthdays, other holidays, and vacations! Click here to go to her tutorial.

Fabric Alphabet
A GREAT educational homemade gift! This would make a great gift for kids aged 1-5 years old. They can be used to learn letters, sounds, the alphabet, spelling and much more. These do take a little time to make, but are well worth it. I've just made the A and B so far, but am planning to finish the rest of the alphabet for a Christmas gift to my son. To make these just use any word processing software ( like Word) and print out the alphabet in large letters (I did mine landscape with two per page, so they're about 7" tall.) Layer your top fabric, batting (cotton preferably), and a backing material (I use inexpensive white muslin.) Trace your letter on the material and cut a 1/4" outside the lines, cutting all three layers at once. Stitch on your drawn line, then cut slits all along the edge, cutting as close to the stitching line as possible without actually cutting through your stitches. Wash and dry to get the nice ragged edge.

I hope these tutorials help you with this crazy time of year! I wish you all a very merry Christmas! And I cant wait see you back here in the new year with many more great tutorials and ideas for you to try out!


Sunday, September 13, 2009

Baby shower gift

We had a baby shower for my cousin, and I actually planned well in advance for this one, so I had plenty of time to give a homemade gift. I started out with the intent of make a doll quilt and a couple other matching baby items to go with it.

I tried out a quilt block I hadnt done before. But I didn't realize how large the block actually was, so by the time it all came together, it was a bit larger than a doll quilt. That's ok though. It can be used as a play mat, diapering pad, or baby carrier blanket for the little cutie until she out grows it and can use it on her own dolls. Then I put together the matching bib and ribbon ball with the leftover fabric.
The moment the windmill blocks came together, I knew I had to outline them with my quilting.
I love how on the backing, it had "embossed" windmills and the design from the quilt front is transferred to the back also.
Then to finished it off, I did little loops for the rest of the quilt. Kind of like wind gushes from the windmills.

Wednesday, August 19, 2009

"Quilt Sandwich"


To prepare your quilt top to be made into a full blown quilt, you'll need to make a "quilt sandwich." And basically what that means is putting all your quilt layers together in preparation for quilting them together (either by hand or machine.)

Sorry I didn't take many pictures of this process, but it's pretty easy so hopefully you'll still get the idea.

To start, lay your backing fabric face down. Since we are working on a small doll quilt, your cutting mat is a great spot to use. If you are working on a larger quilt, use the floor or a large tabletop (but make sure the floor or table are surfaces you don't mind getting scratched up.) Smooth the fabric out. Then place pieces of blue painters tape around all sides, taping the fabric to the work surface, to hold the fabric taut. Be careful not to stretch or pull the fabric. You just need it taut so it doesn't wrinkle or move around under the other layers.

Next smooth out your batting on top of the backing fabric. Batting and cotton magical "stick" together, so no more tape will be needed.

Now lay your quilt top on top of the batting, smoothing it out. Be careful to keep all your pressed seems in their proper place and not flipped over. Also double check to make sure the backing fabric and batting are underlying the entire quilt top. It's important to always cut your batting and backing fabric 2-4" larger on each side to allow for any variance, especially once it's getting quilted. (An easy way to do this is simply lay your quilt top on top of the batting or backing fabric, then using hand scissors, eyeball the extra 2-4" on each side and snip away the batting or backing. It doesn't need to be perfect, because the excess with get trimmed away later.)

The final step is to pin it all together. Using bent quilting safety pins, pin through all the layers.
Place pins approximately 5" apart, which is about the size of your fist. Also, vary the pin placement, row by row. See picture below.

Again, if you're sandwiching anything larger then a doll quilt, this next tool is your best friend. It is used to close the safety pins. Do it once without it, and you'll know what I mean when you wake up the next morning with busied finger tips. It's very inexpensive and can be found at every quilting store.

And that's it. You're done. Just remove the tape from the backing fabric.

In my next couple posts, we'll talk about machine quilting. This is a new topic for me, so I'm in that exciting and giddy phase.

Also if you took a closer look at my quilt sandwich above, you may have noticed that I pieced my batting. We'll talk about that later too.

Monday, August 17, 2009

Doll Quilt Tutorial

Making doll quilts are my favorite way to practice quilting. In this doll quilt, Im trying out the string block. Click here to see my tutorial on how to make the string block.
For the doll quilt, you'll need 4 string blocks. Lay the blocks out, deciding which positioning you like best.
Then sew the top and bottom pieces together using a 1/4" seam. Because of the bulkiness of this type of block, I recommend ironing your seams open. Once that's done, sew the right and left halves together and press the seam open.
Next, we'll add a border. I wanted mine to be 2.5" finished, so I cut my border pieces 3" wide (allowing for a 1/4" on both sides.) For length, measure your blocks. I like to make my borders 1/4" longer than needed, just to make sure it fits.
With the border pieces on the top and bottom, square up the block, cutting off the excess edges on the borders. To do this, line up a long ruler, matching the edge of the string blocks at the top and bottom corners, and using your rotary cutter, trim the border edges

Next we'll need to add the left and right side borders. The width of these will be the same as before, but the length will change. To find the length, simply measure your quilt again, this time including the borders you've just attached (measure from the outside edge of your top border down to the very bottom of your lower border.) Once all the borders are added, square it up again.

Now that all the edges of the blocks have been sewn, you can remove the paper. Be gentle so you dont rip out any seams or damage any fabric. If you used a small stitch length it should come off really easily. If not, then it will just take little bit more time and you'll have to be very careful as to not to not cause any damage. Also, if you went overboard with the glue when making the string block and are having a hard time getting the paper to separate from the fabric strip it was glued to, just dampen the fabric a tiny bit with your finger that's been dipped in water. It wont take much to get the glue to dissolve.After the trauma of removing the paper, press the quilt top again.

Next up, I'll show you how to make the "quilt sandwich" and machine quilt it, then add the binding.

Thursday, August 13, 2009

String Block Tutorial

I've recently seen other quilting bloggers post about string block quilts. Now that I've been sewing for a few years, I finally have enough scraps to start on some stash busting projects. I definitely wanted to try my hand out on the string block, and now it's one of my favorites.

Here's my two cents in a little tutorial to get you started on your own stash busting project.

This is a paper-pieced block, so start by cutting a square piece of paper to use as the foundation for your block. I used regular ol' printer paper, but you can use just about any paper you have on hand, just make sure it's not a thick paper. I've heard phone book pages work well too.

I have a lot of smaller scraps so I'm making my blocks a little smaller, at 6 inches square. You can make your blocks any size you want, up to 12 inches.Next, cut a strip of solid colored fabric (or a print if you'd like) that is long enough to reach all the way from one corner to the other, diagonally across the paper block. The length does not have to be exact, just make sure it fully covers both corners. You do need to make sure the width is exact though - making sure both side are cut straight and has the same width the whole length of the strip. The middle strips are the only ones that will line up when you put multiple blocks together. My white strips are cut 1 in. wide.

Draw a thin line down the center of the strip with a fabric pen or pencil. Using a fabric glue stick (or any washable glue stick) apply a thin amount of glue down the diagonal of the paper block. Dont go overboard on the glue or you will have a heck of a time removing the paper later.Next, lay the white strip of fabric on top of the glue line. Make sure the line drawn on the fabric crosses exactly over the corner. Press the fabric down to make sure it is fully adhered to the block. Here's a close up of how the line should pass perfectly over the corner on both ends.Now we will apply the printed fabrics on both sides of the solid to fill up the rest of the block.

To start out, cut a printed fabric to any width, just make sure both sides are cut straight and that it will reach all the way across the block diagonally.Lay the print facing down on the white strip matching up one long side.
DECREASE the stitch length on your sewing machine in order to perforate the paper when sewing. I set my machine at 1. (It definitely takes a bit longer to sew at such a short stitch length, but it will be well worth your time when you're rippin' off all that paper later. It will be MUCH easier and put less stress on the stitches and fabric. Believe me, I learned the hard way!) Sew a 1/4 in. seam down the edge of the fabric pieces, going through the fabrics AND the paper.Fold the printed fabric over and press.Do the same to the other side of the white strip.And just keep going to cover the rest of the paper block, making sure to vary the widths of the strips. Align the long edge of the next strip with the last strip on the block, just as before with right sides together using a 1/4" seam sewing through the fabrics and paper. Do this on each end of the block, moving away from the center.

Since each strip will have a 1/4" seam on both sides (making a 1/2" total taken away by seam allowances) I would recommend keeping your cut widths between 1" (so the smallest strip will have a 1/2" visible area) to 2". But if you are making a larger block size, like a 12" block, you could definitely use even wider strips.
Once your block is covered, flip it over to the back side and using the paper as a guide, trim the excess fabric.And voila! Your done! Pretty easy. But dont be too excited just yet to start rippin' away all the paper. Remove the paper only when all four sides have been sewn to an adjoining block or border. Then have fun, but be gentle. It should come off really easily if you used a short stitch length.

I love quilt blocks that you don't have a hundred corners to line up. I cant wait to make a bunch more of these! I used fabrics all from the same line (Sweet Escape from Free Spirit.) Make your blocks more scrappy by using any of your scraps from your stash. See examples here, here, and here.

I'd love to hear any questions or comments you may have. If you make anything from my tutorials, I'd love to see it! Post your pictures to the Zanie Zoo flickr pool.

My next tutorial will show you how to combine four string blocks to make a doll quilt. Here's a sneak peak so you get an idea of what it looks like with multiple blocks sewn together.

Tuesday, July 14, 2009

Pincushion

I made my first pincushion my sophomore year of college in a Beginners Sewing class. It was our very first project and we picked our fabrics from the leftover stash bin in the class. I never really cared for it took much. That is until I got back into sewing these past two years and finally appreciated it for all it's paper-pieced beauty. I've been wanting to make another out of fabrics that I actually chose. There are plenty of patterns out there, but when I saw this one from the Moda Bake Shop blog, I couldnt wait to make it. You can head on over there for the complete instructions, but I figured I'd show you how I completed it.

I started out with the Moda Charm pack Soire'e (charm packs are pre-cut 5 in. pieces of all the fabrics from the entire line. It's one of the few way's to actually get your hands on every single fabric from one collection. These are great to keep on hand for little projects just like this or for quilting.)
cut four 3in. squares of your favorite prints and four 3in. squares of a complementary fabric (I used inexpensive white muslin.) Cut all the squares along the diagonal to get the triangles. (Only half of my triangles are pictured below.)
match up a print and a solid facing each other and sew a 1/4" seam along the long side of the triangle, then press. (I like to press my seams open.)
decide your layout for the front and back. Sew pairs together then combine them to complete the block.
here are what I have for my top and bottom blocks.
at this point, the original Moda tutorial has you cut a piece of batting the same size of the blocks and quilt it. I dont think this is necessary and skipped it.

Simply lay the blocks facing each other, and stitch around, leaving an opening for stuffing. Turn it right side out and stuff. Hand stitch the hole closed.
At this point you could be done! I added the buttons and yo-yo like the tutorial suggested and am really glad I did. It gives it the perfect little final touch.