


Bean Bag Balls
 These are great for those sport-loving kiddos who cant live without a ball in hand.
I made these for my son's 2nd birthday, and they were a huge hit. Now if only I could find the baseball and football...
For these I traced a 5" bowl and cut out two circles of fabric and two circles of interfacing for each. Iron one piece of interfacing to the wrong side of each fabric piece. Next, you add the details for each of the different balls. First use a fabric marker to mark the lines. For a basketball, baseball, or football, use a tight zig-zag stitch (the 2nd to smallest your machine will do) and just follow the lines on the fabric. For the soccer ball, I cut out 10 pentagons of black fabric, 5 for each side of the ball, and used a larger zig-zag stitch to applique them on.
Next, just put the two fabric pieces together, right sides facing, and sew around the circle leaving a small opening for turning. Turn the ball the right side out and fill. You can use rice, dried bean, etc. but I chose to use Poly Pellets so the balls would be washable. Lastly, just stitch the opening closed.
Coasters
 These are so incredible easy to make and only use small scraps of fabrics. It would also be great to use non-Christmas fabrics for year round use. And you can make them whatever size you want. Mine ended up around 4".
I cut strips of fabric about 1-1.25" wide by 4.5" long, batting 4" square, and backing 4.5" square. Lay your first strip of fabric, right side up, on top of your batting, overlaying the fabric about 1/4" around the edges of batting (so that the batting doesnt cause extra bulk in the 1/4" seam.) Lay the second piece of fabric right side down on the first piece, lining up the edge with the first fabric and stitch a 1/4" seam allowance, going through the two fabrics and the batting (the two fabrics on top right sides together and batting on the bottom.) Fold the 2nd fabric open and press.
Keep adding more pieces of fabric until your coaster is covered. Square up the top, by triming any excess on the edges. Next place the pieced top, right sides together with the backing material and sew around the coaster, leaving a small opening for turning. Clip the points off of the corners (to eliminate bulk) and turn the coaster right side out. Iron flat and stop stitch around the edge with a 1/8" seam.
For ideas on other fabric coasters, visit the Sewn Fabric Coasters Flickr Group.
Black Apple Dolls
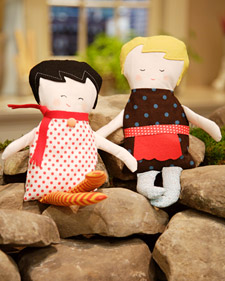 These new modern-faced dolls are all the rage. The Black Apple brand originated on etsy as artwork. I was so excited when I saw that Martha Stewart crafts showcased these dolls, with templates included! They are soo simple and can be made in so many different ways by changing the hair color, facial expression, accessories and clothing, you might find yourself making these every year. No little girl would ever get tired of them! Click here to go to the tutorial.
Fabric {paper} Chain
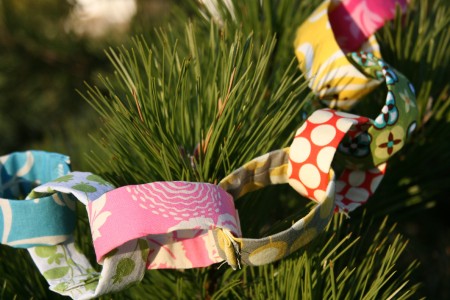 Paper chains are a favorite around the holidays for children. Why not make them more eco-friendly, much more attractive, and not have to re-cut those darn paper strips every year (I dont know about you, but I hate having sore-scissor hand!) Ashley from Film in the Fridge was brilliant when thinking of these. Just small fabric tubes with velcro! I cant wait to make one next year. These would also be great to use with kids for counting down to any exciting event, like birthdays, other holidays, and vacations! Click here to go to her tutorial.
Fabric Alphabet
 A GREAT educational homemade gift! This would make a great gift for kids aged 1-5 years old. They can be used to learn letters, sounds, the alphabet, spelling and much more. These do take a little time to make, but are well worth it. I've just made the A and B so far, but am planning to finish the rest of the alphabet for a Christmas gift to my son. To make these just use any word processing software ( like Word) and print out the alphabet in large letters (I did mine landscape with two per page, so they're about 7" tall.) Layer your top fabric, batting (cotton preferably), and a backing material (I use inexpensive white muslin.) Trace your letter on the material and cut a 1/4" outside the lines, cutting all three layers at once. Stitch on your drawn line, then cut slits all along the edge, cutting as close to the stitching line as possible without actually cutting through your stitches. Wash and dry to get the nice ragged edge.
I hope these tutorials help you with this crazy time of year! I wish you all a very merry Christmas! And I cant wait see you back here in the new year with many more great tutorials and ideas for you to try out!


I absolutely love these ideas! I only wish I could sew--One day I hope too:)
ReplyDeleteThese are great ideas! I agree with the above comment...I wish I knew how to sew. Man I wish I could do HALF of what u do! :o) We still need to plan our playdate. Sorry it's been so crazy with the holidays. Let's plan for next month!
ReplyDeleteAmber, you have the best ideas....I'm must beginning to sew and will try to attempt this sometime this year!
ReplyDelete